
Helm helps application developers and operators manage Kubernetes applications. It allows you to define, install, and upgrade Kubernetes applications. Helm uses a packaging format called charts, a collection of files describing a related set of Kubernetes resources. Other application packaging solutions, such as Kustomize, exist, but nothing comes close to the popularity Helm gained in the Cloud Native space. While Helm is certainly the most popular package manager, it comes with a few limitations. Helm does not offer an efficient dependency management solution. At deployment time, there is no way you can retrieve the dependent resource properties for subsequent resource deployment within the chart. Helm cannot handle custom resource definitions well. We must use values.yaml to supply custom values to the chart and its subcharts. This has no schema validation and, therefore, results in human errors at the time of deployment. Helm does not offer any post-deployment reconciliation support, which is important to ensure any drift in application configuration can be detected and corrected. Companies in the Cloud-native space have been looking at alternatives, and a new open-source project called kro may be that alternative.
kro (Kube Resource Orchestrator) is an open-source, Kubernetes-native, and cloud-agnostic package manager for Kubernetes applications. It is a joint effort by Microsoft, Amazon, and Google, the three big cloud giants. Kro allows you to define custom Kubernetes APIs that define a group of Kubernetes resources and the logical operations between those resources. kro uses the Common Expression Language (CEL) expressions to define the logical operations, pass values between objects, and calculate the order in which the objects should be created.
So, what exactly is kro? Let’s explore that. Here is a simplified representation of what kro helps us do.
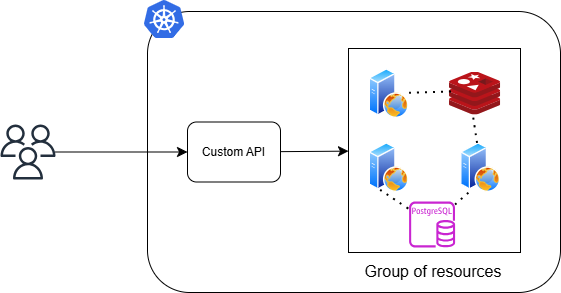
As mentioned earlier, kro allows us to define a custom API. Users and developers can use this custom API to provision instances of a group of resources represented by the custom API. In this image above, when a user creates an instance of the custom API, they will get an instance of the group of resources containing a Redis cache, Postgres DB, and three web service pods.
So, how do you get started using kro to define and provision custom APIs? First, you have to install kro.
$ export KRO_VERSION=$(curl -sL \
    https://api.github.com/repos/kro-run/kro/releases/latest | \
    jq -r '.tag_name | ltrimstr("v")'
  )

$ helm install kro oci://ghcr.io/kro-run/kro/kro \
  --namespace kro \
  --create-namespace \
  --version=${KRO_VERSION}
The helm install command creates a new namespace called kro.
$ kubectl get all -n kro
NAME                      READY   STATUS    RESTARTS      AGE
pod/kro-b667bd485-6lvrt   1/1     Running   2 (36m ago)   4d2h

NAME                  READY   UP-TO-DATE   AVAILABLE   AGE
deployment.apps/kro   1/1     1            1           4d2h

NAME                            DESIRED   CURRENT   READY   AGE
replicaset.apps/kro-b667bd485   1         1         1       4d2h
Once the necessary resources are created, it is time to define a custom API. This custom API is called a ResourceGraphDefinition or rgd.
The following YAML spec is the general schema for a ResourceGraphDefinition.
apiVersion: kro.run/v1alpha1
kind: ResourceGraphDefinition
metadata:
  name: name-of-the-application
spec:
  schema:
    # API version of the application
    apiVersion: v1alpha1
    # This is the resource kind for your application
    kind: Application
    spec:
      # This is where you define the properties or configuration options for your application
      name: string | required=true description="Name of the instance"
      replicas: integer | default=1 minimum=1 maximum=3
    status:
      #Status fields to add to your application instance status
  resources:
  # An array of Kubernetes objects or custom resources such as another rgd that you want to provision
For a working example, we will use what is provided in the documentation for now and build something better in a later post.
apiVersion: kro.run/v1alpha1
kind: ResourceGraphDefinition
metadata:
  name: my-application
spec:
  schema:
    apiVersion: v1alpha1
    kind: Application
    spec:
      name: string
      image: string | default="nginx"
      ingress:
        enabled: boolean | default=false
    status:
      deploymentConditions: ${deployment.status.conditions}
      availableReplicas: ${deployment.status.availableReplicas}

  # Define the resources this API will manage.
  resources:
    - id: deployment
      template:
        apiVersion: apps/v1
        kind: Deployment
        metadata:
          name: ${schema.spec.name}
        spec:
          replicas: 3
          selector:
            matchLabels:
              app: ${schema.spec.name}
          template:
            metadata:
              labels:
                app: ${schema.spec.name}
            spec:
              containers:
                - name: ${schema.spec.name}
                  image: ${schema.spec.image}
                  ports:
                    - containerPort: 80

    - id: service
      template:
        apiVersion: v1
        kind: Service
        metadata:
          name: ${schema.spec.name}-service
        spec:
          selector: ${deployment.spec.selector.matchLabels}
          ports:
            - protocol: TCP
              port: 80
              targetPort: 80

    - id: ingress
      includeWhen:
        - ${schema.spec.ingress.enabled}
      template:
        apiVersion: networking.k8s.io/v1
        kind: Ingress
        metadata:
          name: ${schema.spec.name}-ingress
          annotations:
            kubernetes.io/ingress.class: alb
            alb.ingress.kubernetes.io/scheme: internet-facing
            alb.ingress.kubernetes.io/target-type: ip
            alb.ingress.kubernetes.io/healthcheck-path: /health
            alb.ingress.kubernetes.io/listen-ports: '[{"HTTP": 80}]'
            alb.ingress.kubernetes.io/target-group-attributes: stickiness.enabled=true,stickiness.lb_cookie.duration_seconds=60
        spec:
          rules:
            - http:
                paths:
                  - path: "/"
                    pathType: Prefix
                    backend:
                      service:
                            name: ${service.metadata.name}
                        port:
                          number: 80
In this example, we have a deployment object with an nginx Pod, a ClusterIP service, and an ingress. You can use the interpolation syntax to refer to the values of different spec fields. For example, ${schema.spec.ingress.enabled} gives you the value associated with ingress.enabled from the spec section of the schema.
Although all three are defined in a sequence, there is a dependency. You want the deployment to be ready before creating the service, and similarly, you want the service to be ready before creating an Ingress. In this example, these dependencies can be identified by referring to other objects. For example, the service resource definition uses selector: ${deployment.spec.selector.matchLabels} in its spec. The ingress resource uses name: ${service.metadata.name} in the spec.rules.paths.backend.service. kro uses these clues to build a Directed Acyclic Graph (DAG) for the resources defined in the rgd. You can provision this custom API using the kubectl apply command.
$ kubectl apply -f rgd.yaml
resourcegraphdefinition.kro.run/my-application created

$ kubectl get rgd my-application -owide
NAME             APIVERSION   KIND          STATE    TOPOLOGICALORDER                     AGE
my-application   v1alpha1     Application   Active   ["deployment","service","ingress"]   64s
If everything goes as expected, you should see the rgd in active state and the topological order in which the resources will be provisioned. kro deploys your custom application API definition as a custom resource.
$ kubectl get Applications
No resources found in default namespace.
Remember? Application is the value of the Kind field in our example. So, you have a resource named Applications. Alright. To realize the application through the custom API, you need to create an instance of the custom API.
apiVersion: kro.run/v1alpha1
kind: Application
metadata:
  name: my-application-instance
spec:
  name: my-awesome-app
  ingress:
    enabled: true
You can provide values of all configurable fields from the resource definition within the spec section of the instance. Once again, you can use kubectl apply command to provision this instance.
$ kubectl apply -f instance.yaml
application.kro.run/my-application-instance created

$ k get Applications
NAME                      STATE         SYNCED   AGE
my-application-instance   IN_PROGRESS   False    5s
The state of the custom resource instance will remain in progress until all the resources within the group are created successfully.
$ kubectl get Applications my-application-instance -owide
NAME                      STATE    SYNCED   AGE
my-application-instance   ACTIVE   True     3m2s

$ kubectl get all | grep my-awesome-app
pod/my-awesome-app-9ccb8f99d-62lgx   1/1     Running   0             3m18s
pod/my-awesome-app-9ccb8f99d-9989h   1/1     Running   0             3m18s
pod/my-awesome-app-9ccb8f99d-zkszm   1/1     Running   0             3m18s
service/my-awesome-app-service   ClusterIP   10.99.199.102    <none>        80/TCP         3m13s
deployment.apps/my-awesome-app   3/3     3            3           3m18s
replicaset.apps/my-awesome-app-9ccb8f99d   3         3         3       3m18s
As you see from this example, kro was able to create our resource graph definition as a custom resource and create an instance of that custom resource while taking care of the dependencies. You can also see the custom fields that are added to the custom resource instance’s status.
$ kubectl get Applications my-application-instance -o yaml
apiVersion: kro.run/v1alpha1
kind: Application
metadata:
  annotations:
    ....
  name: my-application-instance
  namespace: default
  resourceVersion: "204024"
  uid: fef4985b-33e3-4643-8e7f-a540948331f5
spec:
  image: nginx
  ingress:
    enabled: true
  name: my-awesome-app
status:
  availableReplicas: 3
  conditions:
  - lastTransitionTime: "2025-03-13T11:36:12Z"
    message: Instance reconciled successfully
    observedGeneration: 1
    reason: ReconciliationSucceeded
    status: "True"
    type: InstanceSynced
  deploymentConditions:
  - lastTransitionTime: "2025-03-13T11:36:11Z"
    lastUpdateTime: "2025-03-13T11:36:11Z"
    message: Deployment has minimum availability.
    reason: MinimumReplicasAvailable
    status: "True"
    type: Available
  - lastTransitionTime: "2025-03-13T11:36:01Z"
    lastUpdateTime: "2025-03-13T11:36:11Z"
    message: ReplicaSet "my-awesome-app-9ccb8f99d" has successfully progressed.
    reason: NewReplicaSetAvailable
    status: "True"
    type: Progressing
  state: ACTIVE
This is a basic example and we shall look at something more useful that helps understand different aspects of using kro in a future post.